
What is a Daguerreotype?
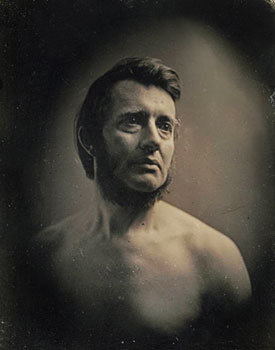 Albert Sands Southworth - Boston, MA 1848 It's a photograph that's made on a copper plate that has a thin layer of pure silver (the precious metal) on it.
The silver covered copper plate is placed over iodine and bromine to sensitize it. These are called "fuming boxes" or "sensitizing boxes". The silver on the plate is converted to silver iodide and silver bromide - light sensitive material. A fume hood is required to do this.
After the plate is sensitized, it's exposed in the camera. Exposures can be anywhere from seconds to several minutes. It depends on how the plate is sensitized, quality of light, aperture etc.
After exposure, the plate is developed over heated mercury, a "mercury pot". This generally takes about two minutes, again, depending on exposure, sensitizing, temperature of the mercury, etc. This is where a fume hood is imperative. Mercury vapors are extremely dangerous, you need to know what you're doing so that you don't kill yourself or others.
After development, the plate is fixed, or stabilized, in sodium thiosulfate (hypo). A lot like a Collodion plate, you fix for twice the amount of time it takes to clear. For example, if the plate clears in 30 seconds, you leave the plate in for another 30 seconds.
Next, a quick wash in distilled water.
The final, and most difficult step, is gilding (with the precious metal gold and hypo). There's a couple of ways of doing this, but I recommend using the gilding stand method.
The Process
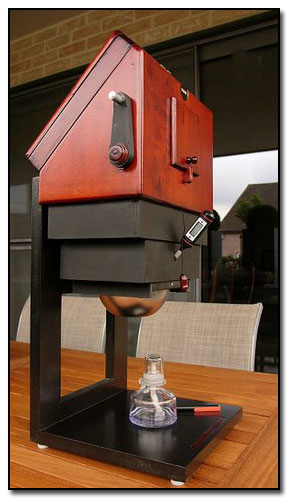 Whole Plate/Half Plate Mercury pot custom designed and built by Rene Smets.Daguerreotypy can be very dangerous and you need specific equipment and knowledge before you attempt to do anything related to it. It would be best to take a course or workshop on the process as a first step. The chemicals involved are extremely toxic and you must understand what you’re doing, and why, before doing it.
1. Copper Plates: The first step is to get some copper plates. I use 18 gauge plates (thickness). You can buy “raw” unfinished copper plates and polish them yourself. Or, you can buy polished plates that are ready for silver plating. If you choose the former, you will have to polish the copper to a nice mirror finish before you plate them. If you choose the latter, you will have to have the plates cut to size. The quality of the copper surface will determine what kind of silver finish you get.
2. Silver Plating: Next, the polished copper plates need to be electroplated (or clad) with silver. There are a few places where you can have this done, or, you can electroplate them yourself.
3. Polishing the Plates: Setup a bench grinder with a muslin buffing wheel on one side and a fine all finishing wheel on the other side. A polishing block, or something to hold your plate is a very useful piece of equipment for completing this step. I had a custom "copper plate polishing block" made to accommodate Half Plate and Whole Plate sizes.
4. Sensitizing Plates: After the plate is polished and it is completely clean, free of finger prints and/or marks of any kind, it’s ready for the Iodine. There are varying times and fuming colors related to this - it's all by experience and inspection. The color rotation over Iodine goes Straw, Golden Yellow, Rose, Violet, Blue and Green. Then the cycle starts over. Usually, it's about 15-20 seconds to get a Rose color with iodine (sensitive for portraits). Inspect it with a low-watt (white) light reflected from a white surface. If it's good, put it back over the iodine for another 10 seconds to erase the white light/exposure. After iodine, comes bromine. The process is basically the same as iodine. The plate should be ready for exposure.
5. Exposure: This varies - too many variables - trials and tests.
6. Development: This is one of the most dangerous steps in the process. Heated mercury vapors are very powerful and very dangerous to your health/life. Without question, you need a fume hood (w/duct) to do this. Even out of doors, it's very dangerous. The exposed plate is placed in a mercury pot. The mercury pot is a box that allows heated mercury to rise and fume the plate to bring the image out. I had a custom mercury pot built to develop Half Plates and Whole Plates. Typically, development is about 2 minutes over 100 C mercury. This can be done by inspection, too.
7. Fixing: A weak solution of sodium thiosulfate is used to fix the plate.
8. Gilding: Gold cholride and sodium thiosulfate is used to gild the plate - this is tricky with a gilding stand, but a little easier in a pan.
9. Washing, Drying & Presentation: Wash the plate in distilled water for a few minutes and use a hair dryer or alcohol lamp to get the water off. Daguerreotypes need to be cover with glass (put a gasket between the plate and glass). They can be framed or mounted whatever way you prefer.
If you are interested in learning the Daguerreotype process, you can check here for Quinn's next course or lecture on the process.
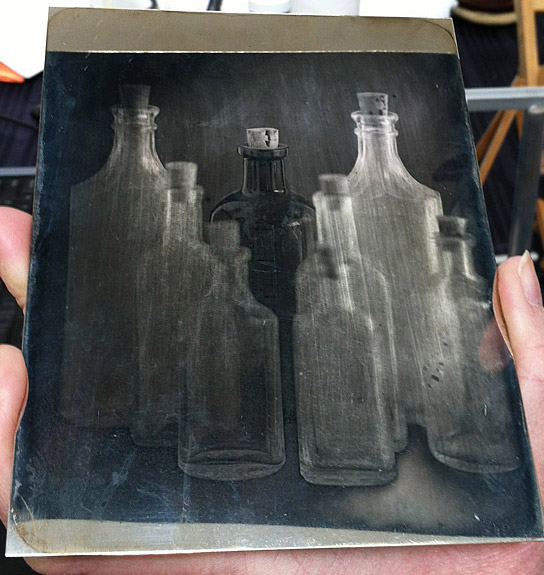 Half Plate Daguerreotype - Studio Q 2012